Proxy servers are excellent if you want online anonymity. By hiding or masking your IP address, you can browse in total privacy. Any third parties that may be monitoring your activities will not be able to see you. Further, you can access content that may be outside your geographical location.
Do you use the internet to source large amounts of data? The sites may have banned you because of your activities. Here is what you should do, simply install a rotating residential proxy. Every search request goes out with a different IP address. The sites will never pinpoint your location.
But what if you are using your mobile phone to browse? You still want the benefits of a proxy but on your mobile device. Our article will show you three ways to set up an Android proxy server for Wi-Fi.
Setting Up Your Android Proxy Server for Wi-Fi
Table of Contents
If you are using open or business networks, it helps to have some anonymity. The Android proxy for the Wi-Fi connection provides just that. If you have been struggling to configure your Android proxy server for Wi-Fi, read on. We will share a step-by-step process with you.
Take note of the following:
- It helps to know the version of the phone you are using
- You will need to set up the Android proxy for every new Wi-Fi connection. The Android proxy will not pick up on a network by default. However, once you set it up, it will remember it the next time around.
- You will need some of the login details from the proxy service provider
- Some of your Android apps may not work with proxies.
1. Setting Up the Android Proxy Server for a New Network
Let’s start by setting up the Android proxy server for a new network. Here is what you need to do.
- Open your Android device
- Go to settings > apps > Network and internet

- Click on Wi-Fi. If you had disabled it, please enable it. You will see all the networks that are available to you.
- Choose the Wi-Fi for which you want to set up the proxy
- Click on the pencil icon under network details.

Depending on the device, you may instead get a pop-up to forget or modify the network. This is mostly applicable to Android 4.2 and 5.0.
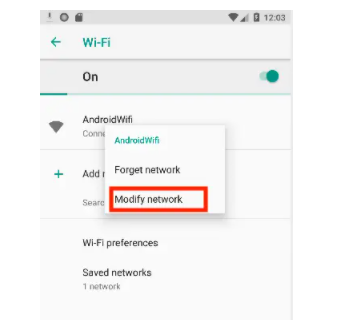
It will take you to a screen that allows you to edit your network details. For new Wi-Fi networks, you will need to input a password.

- Click on the down arrow in the advanced options to display the proxy settings
- By default, it is at none. To change this, click on the down arrow again
You get three options; None, manual, and proxy auto-configuration.
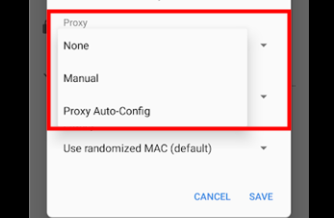
You will get the following screens depending on the option you choose.
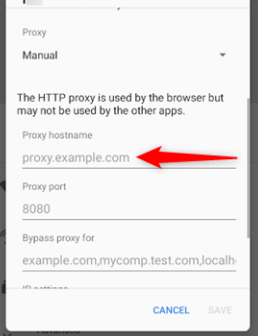
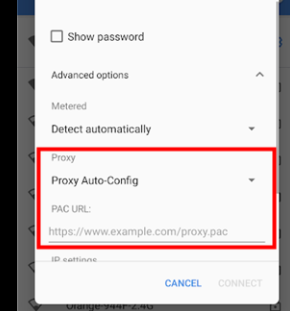
Auto-configuration
With auto-configuration, you will need the Pac URL. You can get this from the network administrator or proxy provider. Do note; the older Android models may not have this option.
Input the relevant information. If it is a new network, you will need to click on connect. For existing networks, press the save button to store the new configurations.
2. Configuring Android Proxy on WPAD Networks
Schools and businesses may often implement web proxy auto-discovery protocol (WPAD). It enables the distribution of proxy settings to different devices on the network.
Android as a platform does not support WPAD. This is in contrast to other operating systems like Chrome OS, iOS, Mac OS, and Windows.
In such a case, you will not be able to use the proxy auto-configuration. You will need to use the manual option. The other choice is to avail the right script to enable automatic configuration.
For manual configuration, enter the proxy details. You will need the IP address, port, and hostname. The proxy provider should be able to avail the information to you.
You also have the option of bypassing specific addresses. You can enter as many as you want in the Bypass proxy for section. It allows you to go straight to these sites without routing the request through the proxy. Remember to use a comma to separate the different addresses.
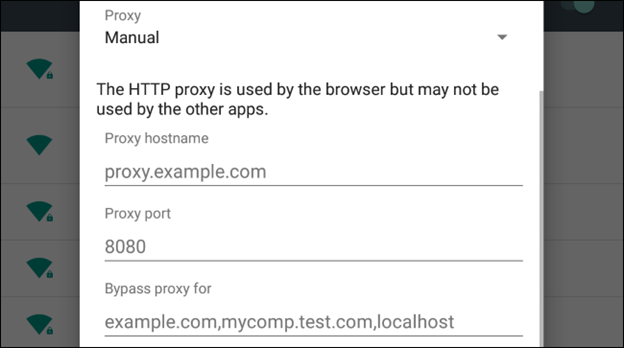
Once you finish inputting the details, do not forget to save them. You will need to repeat the process for every new Wi-Fi network. The Android proxy server will not automatically configure for new connections.
3. Setting Up the Android Proxy for Samsung Devices
The Samsung setting is a bit different from the other models. Follow the steps below to set up your Android proxy server.
- Go to setting > connections >Wi-Fi (make sure you enable the Wi-Fi)
- To go to the advanced settings, click on the gear icon to configure an existing network.
![]()
- Next, go to Advanced > proxy setting > none > Choose Manual or auto-configuration
Now, like in the case above, enter the relevant details, including hostname, IP address, and port. You can also determine which pages you would want the proxy to bypass.
With auto-configuration, you will also need the PAC web address. Finish the setup by clicking on save.
You may also need to input a username and password for new Wi-Fi connections. In this case, you will click on the connect button.
Final Thoughts
It is a good idea to set up a proxy if you use open networks. You get online anonymity and can browse without worrying that someone is monitoring your activities.
When shopping for proxies, look for those that give data encryption for additional security. We have shared three ways to set up your Android proxy server for Wi-Fi.
Do note; different Android devices will have different settings. It helps to know the features of your phone so that it becomes easy to configure it. Also, remember to get the relevant details from your proxy service provider. You will need to set up your Android device for every new Wi-Fi connection.
The advantage is that once you do, your device will not forget it. Every time you are on the network, it will automatically connect.


